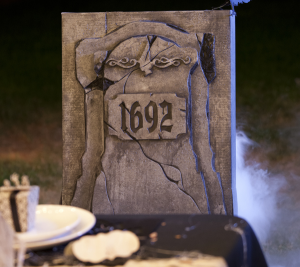
Need the perfect centerpiece for your Halloween table? How about a cool tombstone made of foam. Doesn’t this look like real stone!?
The nice folks at Cricut have shared the instructions with us for making this spooktacular decoration.
Materials:
- Cricut Craft Room® Design Software
- Paint sealer
- Boxes to fit over chair backs
- Utility knife
- Black acrylic paint
- Hot glue gun
- Faux stone spray paint
- 12″ x 24″ Cutting Mat
- Gray spray paint
- Cardstock (1)
- Mod Podge
- Foam boards (2)
- Paper towels
- Foam sheets (3)
- Foam brushes
Instructions:
STEP 1 – Cricut® Cuts: Use project cut file (CCR File) to create cuts.
1. Headstone template a. Cardstock headstone (Headstone layer)
2. Headstone embellishments a. Foam witch with flourishes (Witch layer) b. Foam 1692 in bracket (Year layer)
STEP 2 – Create headstone template from cut 1a. Trace image onto foam board. Cut out a larger headstone layer by tracing template three inches bigger. Use utility knife to cut out headstone. Use hot glue gun to adhere headstone to box.
STEP 3 – Create headstone embellishments from cuts 2a-2b. Use hot glue gun to adhere embellishments to headstone.
STEP 4 – Use utility knife to distress headstone so it appears cracked and damaged. Seal headstone using Mod Podge. Set aside to dry.
STEP 5 – Lightly spray headstone with faux stone spray paint. Spray headstone with gray spray paint. Set aside dry.
STEP 6 – Make a black paint wash by mixing water with black acrylic paint. Brush the wash onto headstone. Use a crumpled paper towel to dab the wash off in places to create a better stone effect. Fill in any desired dark areas with black paint. Set aside to dry.
STEP 7 – Use paint sealer to seal the finished headstone.
STEP 8 – Embellish as desired.
You can also visit the Cricut Project Center for more info.
-Heather


Leave a Reply