Michelle created this quick and easy Halloween card using dies and colored cardstocks. I love how she added the eye glasses to add a bit of whimsy to the ghost! Notice how thick her sentiment is, she die cut it 3 times and stacked it for some depth. Find her step by step directions at the Spellbinder blog.
With Halloween coming soon you’re probably working on some handmade cards to send to family and friends or even pass out to special trick or treaters. Ghosts seem to be a very popular Halloween theme this year with lots of cute and spooky stamps, stencils and die designs being released. So let’s step into the great beyond and get inspired by some Ghostly Greetings.
Below each photo you’ll see a link, click it for details like products used tutorials and techniques.
 LeeAnn used layering stencils and ink blending to create her trendy faux postage card. The ghost is only one of a few icon Halloween designs on her card there’s also black cats, Jack O’ Lanterns, bats and more. She also added stamped faux cancelation stamps to tie the postage theme all together. Find direction at the LDRS Creative blog.
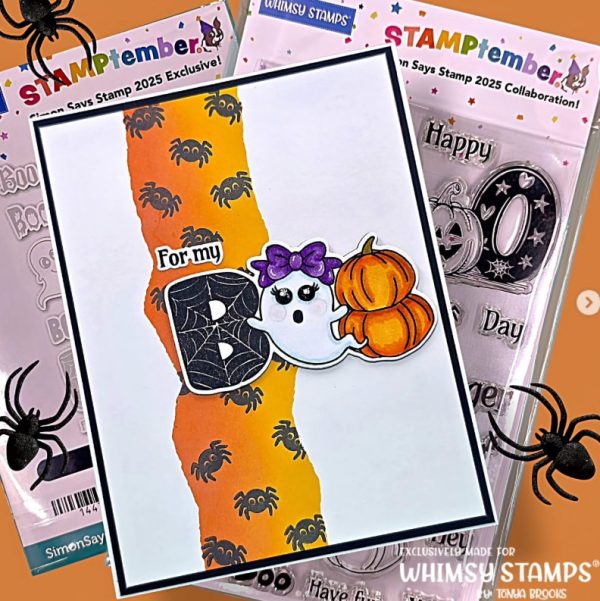
This girly ghostie has a big bow and along with a spiderweb B and a pumpkin O they spell BOO on this darling card from Tonya the used products from Whimsy stamps. For the background she tore paper to mask off the sides, ink blended in orange and then stamped little spiders. I came across her idea at her Tonya Brooks 2 Instagram page.
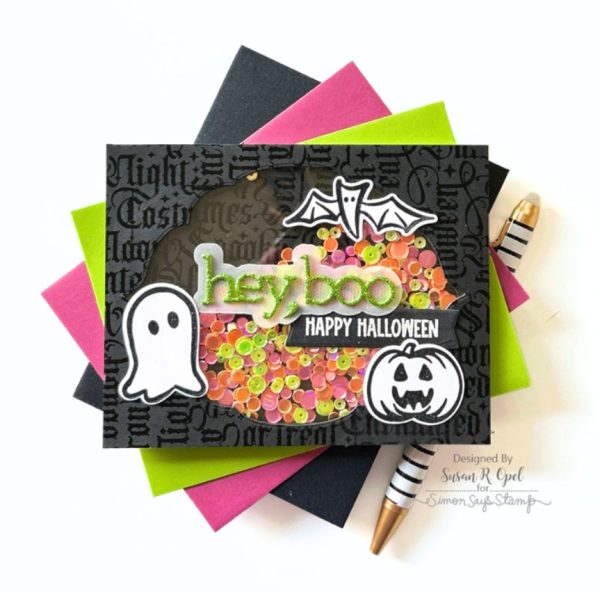
Susan created a dark black and white card with black on black stamped background and stamped images with no color added. Instead she added her color with bold neon sequins in the shaker section and a bright green glittery die cut sentiment over vellum. Find more details at the Simon Says Stamp blog.
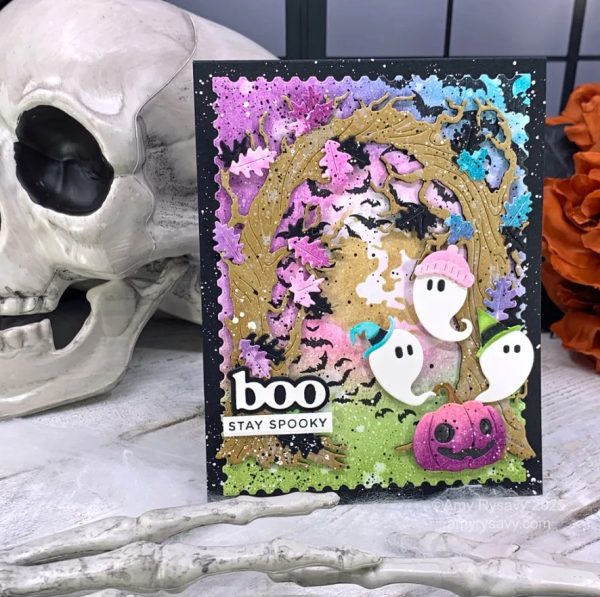
I love the color combo on this spooky forest card from Amy R.! She masked and ink blended her background, stamping a group of bats, adding layers of die cut spooky trees over top, placing watercolor and die cut leaves all around and then included the ink blended pumpkin with die cut ghosts flying out. Watch her video tutorial at the Prairie Paper and Ink blog.

June used dies to create this sweet Halloween bucket card that is also a shaker element! I like how she added some die cut spiderweb to the bucket to match the background and notice how she backed the die cut sentiment words with vellum, it adds to the ghostly feel. Learn more at the Pretty Pink Posh blog.
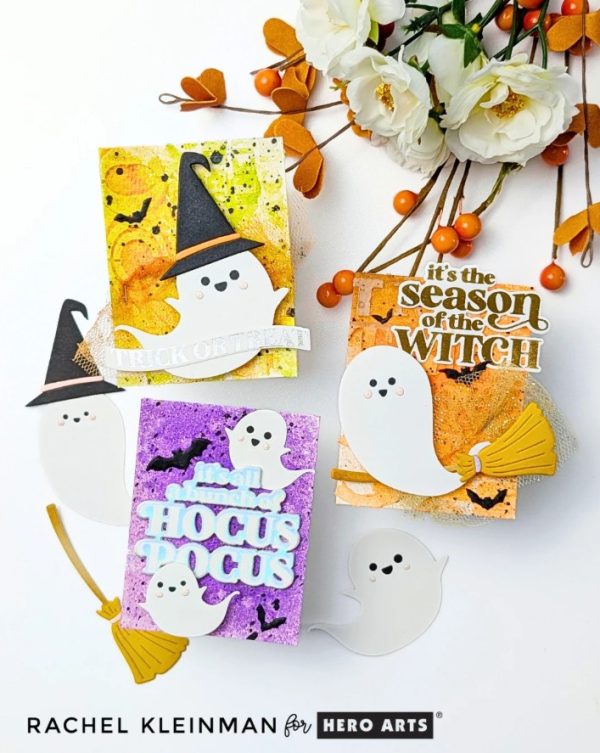
Instead of traditionally sized cards Rachel created some ATC, artist trading cards the size of baseball cards. She used mixed media techniques for the backgrounds with stenciling, paste, water reactive inks, foiling, splatter and more. Over top she added her die cut ghosts with broom, hat and bats and foiled sentiments. Watch her video tutorial at the Hero Arts blog.
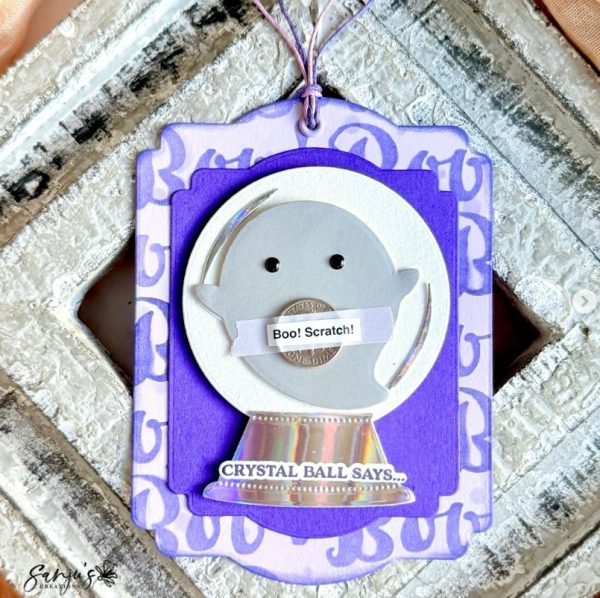
This amazing die cut tag from Sanja has a die cut crystal ball with silver and shimmer papers, a BOO stamped background and a fun ghost. But the coolest thing about this card is it’s a scratcher! Using the coin the recipient scratches the ghost to reveal the rest of the sentiment! I spotted this idea on the Papertrey Ink Instagram page.
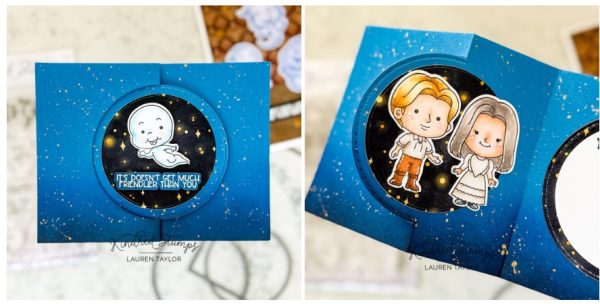
Using stamps from Kindred Stamps Lauren created a fun flipper card inspired the the 90’s movie Casper. The background is made with blue cardstock splattered with white along with golden stary pattern paper. The best part is the flipper, when opened it turns the ghost into a human. Take a closer look at the Lauren Taylor Made blog.
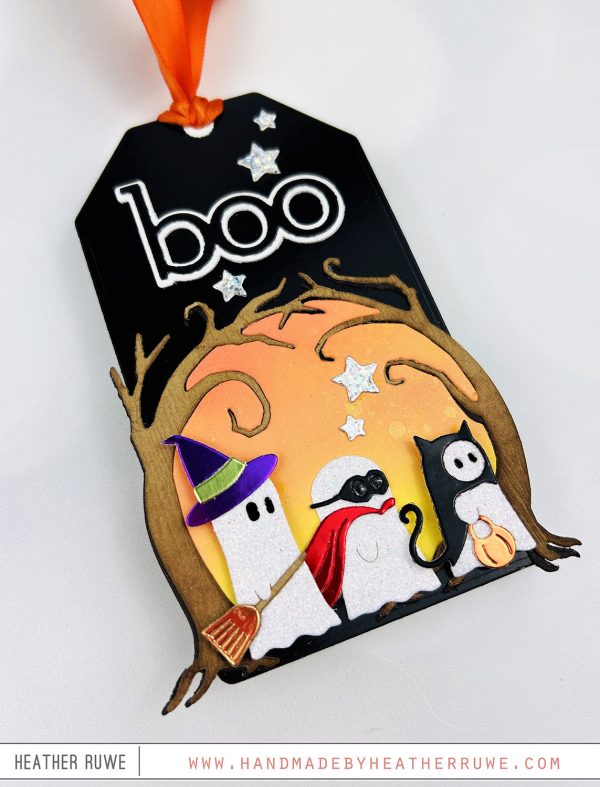
Heather used a variety of specialty papers to create this amazing Halloween tag. Each die cut ghost is dressed up to go Trick or Treating as a witch, super hero and black cat. To add all the shimmer and shine she used glossy, glitter, foil and holographic papers. Float over to the Hand Made by Heather blog for more info.

This creepy house is haunted by two ghost that don’t seem all that scary. Maria used stenciling and splatter for the background, die cut and dry embossed the house and added the die cut ghosts that have been cut from glitter paper. Find these products over at Kat Scrappiness Inc.

I love all the textures on this card from Elaine! There’s a dry embossed background, die cut glittery and vellum sentiment, letter pressed silver spider web, shiny gems and stamped ghosts colored with Copic Markers. Watch a coloring video at her Marker Geek blog.
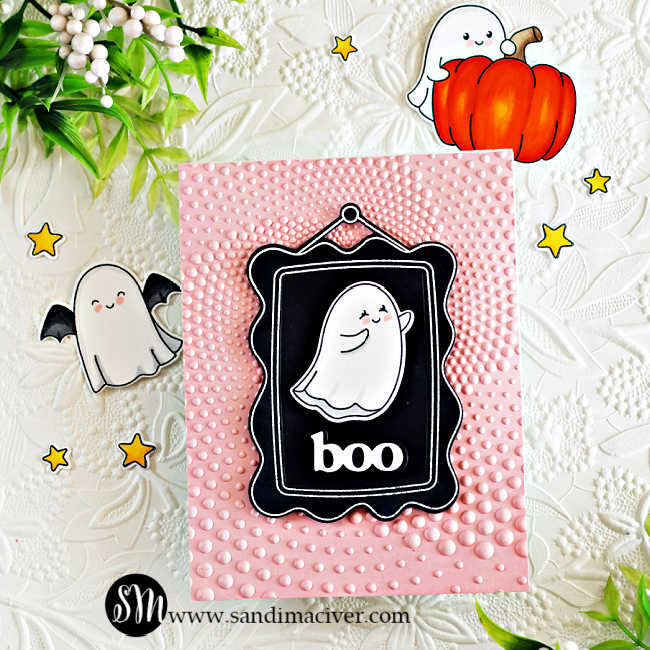
And last but certainly not least is this cute ghostly card from Sandi. She added the sweet touch of a dry embossed pink base to her card, a white heat embossed frame on black cardstock and adorable white ghost subtly colored with Copics. Find all the details at the Sandi Maciver blog.
I hope you’ve enjoyed floating around with these ghosts today!
-Heather
You can shop some of our affiliate companies mentioned in this post: