• Home
  • Suggest A Craft
  • DIY Newsletter

Card Making

News, techniques and inspirations

  • About CraftGossip
  • Our Network
    • Bath & Body Crafts
    • Candle Making Ideas
    • Crochet Ideas
    • Cross Stitch
    • Edible Crafts
    • Felting Patterns
    • Glass Art
    • Home & Garden Ideas
    • Indie Crafts
    • Jewelry Making
    • Kids Crafts
    • Knitting Patterns
    • Lesson Plans
    • Needlework
    • Party Ideas
    • Polymer Clay
    • Quilting Ideas
    • Recycled Crafts
    • Scrapbooking
    • Sewing Patterns
    • Card Making
    • DIY Weddings
    • Not Craft Ideas
  • Giveaways
  • Roundups
  • Store
  • Search

Product Review and Special Offer: Cricut Iron On

April 2, 2013 by Heather Holbrook

Product Review and Special Offer: Cricut Iron On

I recently got a chance to try out a cool, brand new product from Cricut, Iron On material! It comes in many different colors and even in glitter. It’s very simple to cut the Iron On material with the Cricut, you lay it liner side down on your mat and use the “kiss” function so it only cuts through the top layer, leaving the liner sheet intact. Be sure to flip images and especially text so they are going the correct way when you’re done. Once your finished cutting out your shapes weed away the unwanted part of the image (using the Cricut weeding tool is very helpful with this). With your iron set on a cotton setting heat the fabric you wish to adhere your designs to for 10-15 seconds and then lay the die cuts face down (with the liner up), lay a cloth or light towel over top and heat with your iron for 20-30 seconds. Lift off the towel and let everything cool, then peel away the liner and viola’, you’ve got a beautiful iron on image!

For my projects I made a couple of pretty matching wall hangings. I found a shaped fabric book at the craft store and took it apart to use the individual pages. I die cut my shapes, a bird and cage, a frame, a key and a woman’s silhouette from the Heritage, Sophie and Fancy Frames Cricut cartridges using the black and gray iron on material. I ironed on my shapes onto the fabric panels and then stamped a quote (one from Emily Dickinsen and one from William Blake) on each using permanent ink. I added some buttons to some red burlap flowers and adhered those to my panels. Then I added large eyelets to the holes and twill red ribbon to hang them from. I’m so happy with the results.

cricutironon3

I loved the Iron On material, the Cricut cut it like butter, even the more detailed designs like the frame and key and it ironed on easily and beautifully. The material even layers nicely so you can place one color over another for layered images.

irononbundle

This terrific new product from Cricut will be available to the public on April 11th but you can actually order it now! Cricut is offering our readers a Pre-sale bundle offer, you’ll receive 1 roll of Iron On lite Pink, 1 roll of Iron On lite Cyan blue and 1 roll of Glitter in black for only $34.99! Click here to take advantage of this great offer.

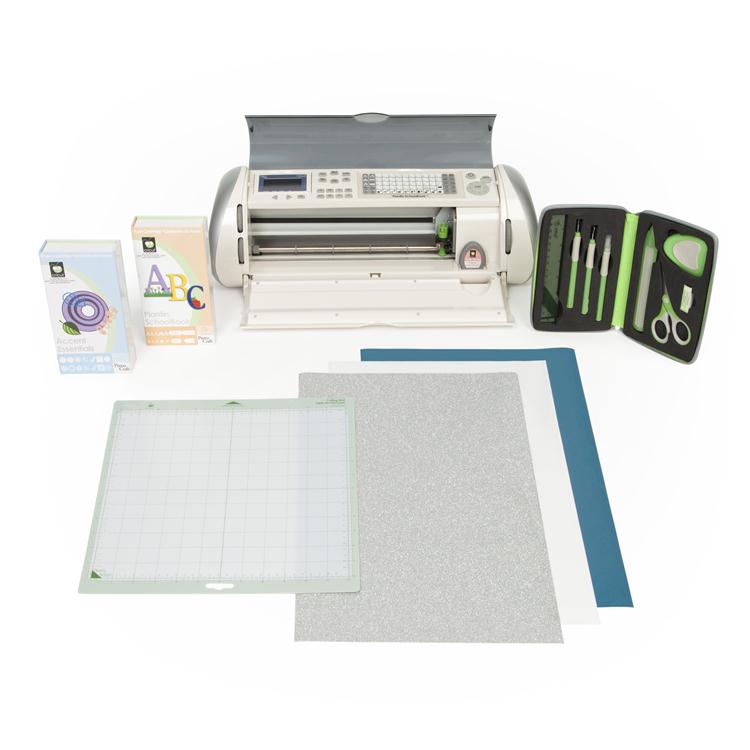
And for those who don’t already have a Cricut we also have a bundle offer for you that includes the Cricut Expression Machine, the tool kit, and one roll each of Iron On in lite white, lite teal and glitter silver for only $199.99! Click here to take advantage of this terrific offer.

-Heather


Next Idea:

  • Product Review: Anna Griffin Card Kit
«
»

Comments

  1. Leanne says

    April 2, 2013 at 8:06 am

    Those are darling! I love the fun embellishments you added too.

  2. Kelly @eclecticmommy says

    April 2, 2013 at 10:36 pm

    I’m loving all the unique and creative ways to use the iron-on.

Have you read?

18 Fun and Festive Handmade Birthday Card Ideas

18 Fun and Festive Handmade Birthday Card Ideas

This delicious card has a tall layered cake with pastel rainbow colors, strawberries and dripping frosting all made with dies.  Catherine also used stamps to add some adorable Capybaras. I love how she double layered the die cut sentiments and … Read More ...

Categories

3d alcohol markers altered art birthday cards christmas cards coloring pages copic markers Die Cutting digital stamps distress Explosion Halloween heat embossing ink sprays interactive cards mixed media pop up card slimline valentines day water color

RSS More Articles

  • How to Make Handmade Pottery Ceramic Wind Chimes
  • My Honest Take on Sewing the Nina Jumpsuit from Creativebug
  • 12 Road Trip Travel Scrapbook Layout Ideas
  • Use LEGOs to Build Landmarks from Around the World
  • Get Your Fruits by Knitting the Fruit Salad Vest
  • Why Do Your Kids Play with the Box? An Interview with Child Psychologist Dr. Lucy Harper
  • Ottomania- Free Crochet Pattern
  • How to Make Your Own Lush-Inspired Massage Bar at Home
  • Snowflakes Falling on My Head Quilt Pattern
  • Spooky and Stylish: How to Make Halloween Splatter Pumpkins for a Bold Décor Statement

Pick Your Blog

  • Sewing
  • Knitting
  • Quilting
  • Crochet
  • Home & Garden
  • Recycled Crafts
  • Scrapbooking
  • Card Making
  • Polymer Clay
  • Cross-Stitch
  • Edible Crafts
  • Felting
  • Glass Art
  • Indie Crafts
  • Kids Crafts
  • Jewelry Making
  • Lesson Plans
  • Needlework
  • Bath & Body
  • Party Ideas
  • Candle Making
  • DIY Weddings
  • Not Craft
  • Free Craft Projects

Copyright © 2025 · CraftGossip | Start Here | Contact Us | Link to Us | Your Editors | Privacy and affiliate policy